Do you want to make your WooCommerce store SEO-friendly?
Well, then this guide is for you. In this guide, we will help you optimize your WooCommerce store for search engines and get more organic traffic to your site.
However, before we dive into SEO configuration and optimization, let’s first understand what WooCommerce is and how search engine friendly it is.
What is WooCommerce?
With about 28% of the eCommerce sites built with WooCommerce, it is the most popular eCommerce platform (and plugin) in the market. WooCommerce enables you to add all the essential eCommerce functionalities from the store page to the checkout and payment system to your WordPress site.
It is an open-source WordPress plugin with a strong community of developers behind its management and updates.
With WooCommerce, you also get many additional extensions developed by the WooCommerce team and other third-party companies, empowering you to add more features and sell anything on your WordPress site.
Is WooCommerce SEO-friendly?
Unlike other popular eCommerce platforms like Shopify, BigCommerce, WooCommerce is not a self-hosted eCommerce platform that provides SEO-optimized pages and settings.
WooCommerce runs on WordPress, which is already an SEO-optimized platform and allows you to add SEO plugins like Yoast SEO to configure your site for search engine visibility.
So, the answer to the question is – Yes! WooCommerce is SEO-friendly.
We will now show you how to configure and optimize your WooCommerce store to improve ranking on search result pages.
Step-by-step guide to set up WooCommerce SEO
WooCommerce is a great platform when it comes to ease of use and design customization flexibility. But the design of your online store won’t matter unless you get people to visit your site.
So, let’s make your WooCommerce store SEO-friendly.
1. Make sure your site is Indexable
WordPress comes with a built-in option to stop search engines from indexing your site.
You can find this option in the Settings » Reading section.

WordPress keeps this option unchecked by default, and it is a good idea to make sure that it remains that way.
2. Update permalinks for posts and product pages
Permalinks are the URL structure of your site, and it is an integral part of your site for both search engines and visitors as they use these URLs to index and visit your site.
It is very important to keep your URL structure clear and memorable. By default, WordPress uses a permalink structure that’s not SEO-friendly.
It looks something like this: https://ecomsutra.com/?p=901
Clearly, these URLs are not SEO-friendly as search engines can’t translate them or relate them to the page content. Some examples of SEO-friendly URLs are –
https://ecomsutra.com/wordpress-plugins-for-ecommerce-sites/
https://ecomsutra.com/woocommerce-tutorial/
In these URLs, you can easily guess what you can expect on the page, and the same goes for the search engines.
So, your objective should be to create a clear URL structure that defines your site’s structure.
To update the permalinks, you will need to visit the Settings » Permalinks page. Here, WordPress presents you with different formats of permalink that you can use.
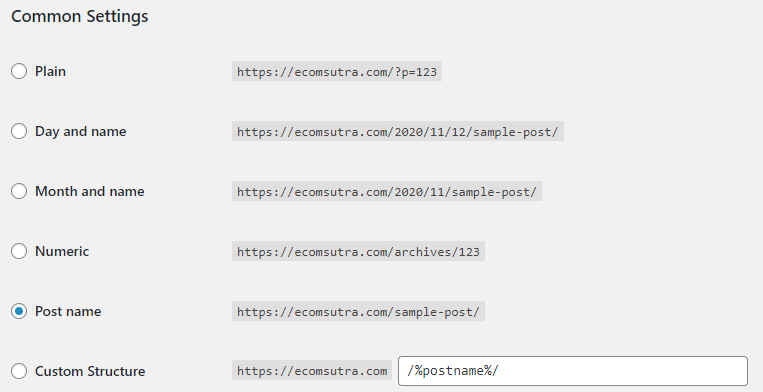
Since you are creating an eCommerce site, we recommend you go with the “Post name” option. As apart from product pages, most of your content will be for blog posts, so you don’t need to complex the URL by adding archive names or dates.
On scrolling down further, you will also see options to set up product permalinks as well.
Here, you can select the base for your product page URL. You can choose the “Shop base” option to keep the URL short or if you want to include a product category in the URL, select the “Shop with category” option.
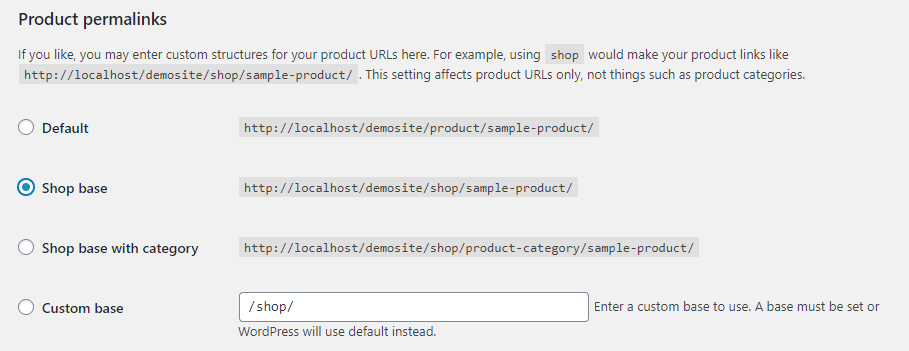
Or you can also create a custom base of the URL like “marketplace,” “store,” “store/product-category/,” etc.
Once you’ve set up the desired permalink for the page, click the “Save changes” button to store your settings.
3. Install & set up the WordPress SEO plugin
Once you have set up the permalinks for your site, it’s time to pick the best SEO plugin for your website.
WordPress SEO plugins allow you to configure your site for search engine visibility by adding meta tags, schemas, robots.txt, and more. It also allows you to optimize your blogs and articles to ensure that it is SEO-optimized.
There are several SEO plugins for WordPress sites, but the most widely used ones are Yoast SEO, All in One SEO, and Rank Math. All are effective, but we at EcomSutra use Yoast, so we will be using Yoast as a reference for this guide.
To install the All-in-One SEO plugin, head over to Plugins » Add new. Search for AIOSEO, click Install Now, and then activate it.
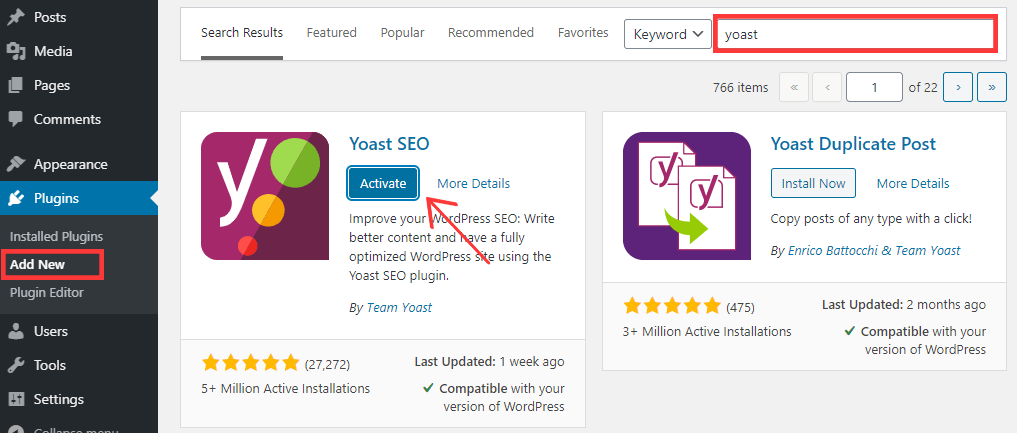
Once it is activated, head over to SEO » Search Appearance from the sidebar.
Here you can choose what you want to show in the search results and how. For example, if you don’t want to index your category pages, simply go to the Taxonomies section and toggle the button to “NO”.
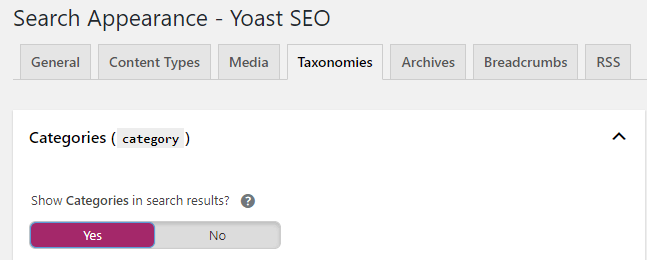
Here, you can also set up the default SEO title and meta description structure for the pages.
4. Submit sitemap to search engines
AIOSEO creates the sitemap for your site as soon as it is activated. So, if you are using Yoast SEO, you can find your sitemap by going to this URL: yourdomain.com/sitemap_index.xml where “yourdomain.com” will be replaced by your website address.
Here’s what the EcomSutra sitemap looks like at the time of writing this article.
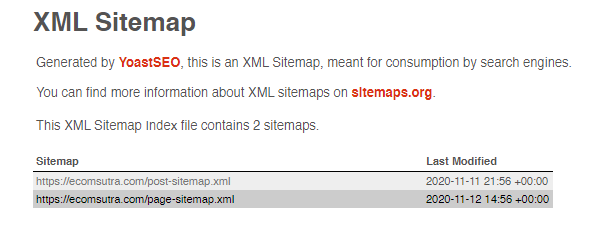
Remember that the sitemap generated by Yoast is public, and anyone can see it. There’s no privacy or security threat in it.
Now, why do you need to submit sitemaps to search engines?
According to Sitemaps.org – Sitemap is an XML file that lists URLs for a site along with additional metadata about each URL (when it was last updated, how often it usually changes, and how important it is, relative to other URLs in the site) so that search engines can more intelligently crawl the site.
In simple words, A sitemap is a blueprint of your website that helps search engines like Google, Yahoo, and Bing use your sitemap to find different pages on your site and crawl it periodically to index and rank it on search results.
And that’s why you need to submit the sitemaps to search engines, and here’s how you can do it for Google.
Just go to Google Search Console, sign in (or create your account and verify your site’s ownership). Next, select the “Sitemaps” option from the sidebar and then add your new sitemap as shown below:

Similarly, go to the Bing Webmaster Tool and submit your sitemap to Bing Search Engine. You can refer to this official guide by Bing Webmasters for guidance.
5. Connect Google Analytics
Google Analytics allows you to track your website visitors and provide data to analyze your website traffic. In eCommerce, you must track your website visitors’ behavior to optimize your marketing strategy and website design to improve conversion rate.
To install Google Analytics on your WordPress site, you simply have to add their tracking code in the header section of your site. You can see a complete guide to connecting Google Analytics with WordPress sites here.
However, for an eCommerce site, you want to track lots of metrics like revenue generated, checkout page drop-off, events, and more, which can be challenging to configure manually.
That’s why we recommend the MonsterInsights WordPress plugin to connect your site with WordPress and configure it to track events and important eCommerce metrics without using any codes.
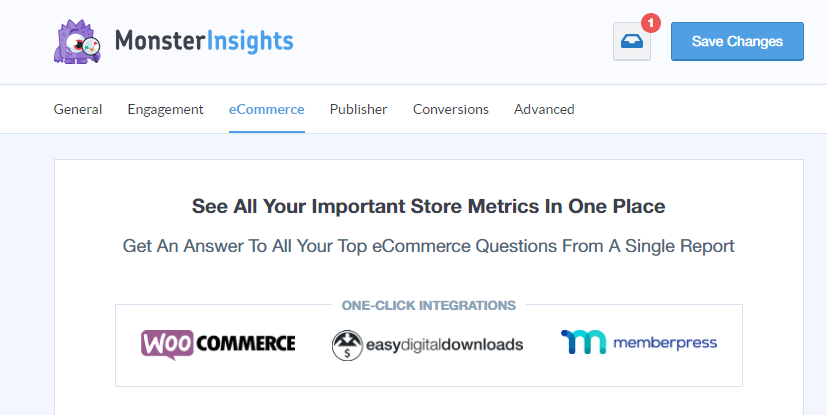
MonsterInsights comes with a free version that allows you to connect Google Analytics with your site. But to track eCommerce metrics, you will need its Premium version.
6. Craft SEO-friendly Product titles
Just like blog post titles, product titles are also very crucial for both SEO and conversion on the site.
For conversion, you want to keep the product title short with branding, and for SEO, you want the product title descriptive enough to let search engines know what the product is and for which keywords you want it to rank for.
So, before going ahead, you want to conduct comprehensive keyword research to find all the potential keywords related to the product and include them in the title and description which you will learn in later sections.
If you are using the AIOSEO plugin on your site, it will allow you to optimize your product titles for search engines while adding (or editing) the products to your site.
To optimize the product titles for SEO, you will need to go to the WooCommerce product editing page and scroll down to the Yoast SEO section.
Here, you will see the Google search preview of the product.
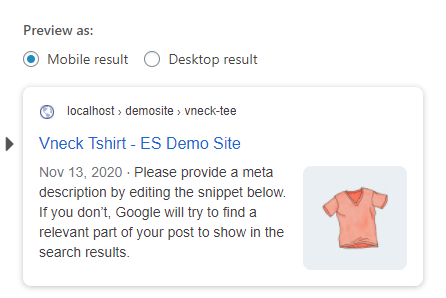
In the above image, you can see the Product title is SEO-friendly to make it rank for keywords like “V-neck Cotton T-shirt”.
You can change the SEO title of your product without affecting how it appears on your site using the Yoast editing section as shown below.
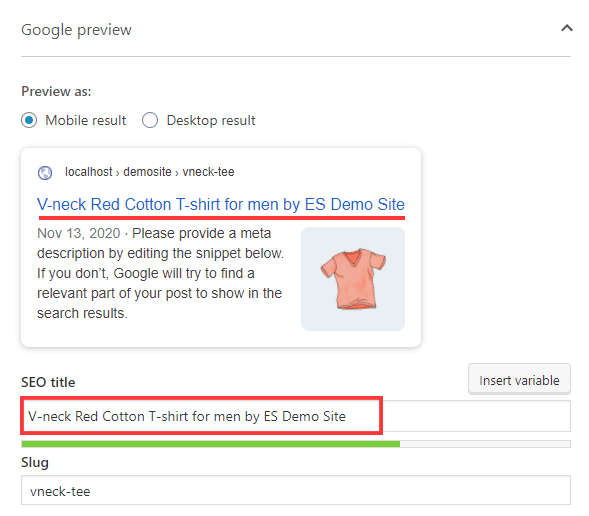
By crafting SEO-friendly product titles, you can ensure that the product ranks for your targeted keywords.
7. Always add SEO-optimized product description
Product description plays a vital role in the on-page SEO of the product pages on your site. It is a section where you describe your product in detail to help your customers decide.
And it is also a section where you can add the target keywords you want to rank for. Usually, product descriptions are short, but it entirely depends on your product type and website design.
In case you have a long product description, then it’s a good practice to optimize the SEO product description from the Yoast SEO section as we did in the last step for the Product title.
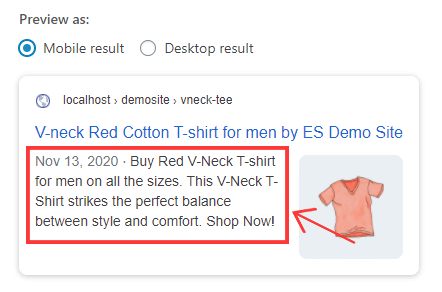
This product description is not displayed on your website pages, but it will be used by search engines to learn about your products and show it below your product title in Search result pages.
8. Keep the product slug short and SEO-friendly
The product slug is the permalink of your product pages. In the above examples, you might have noticed that we have used “vneck-tee” as the slug for the V-neck T-shirt product.
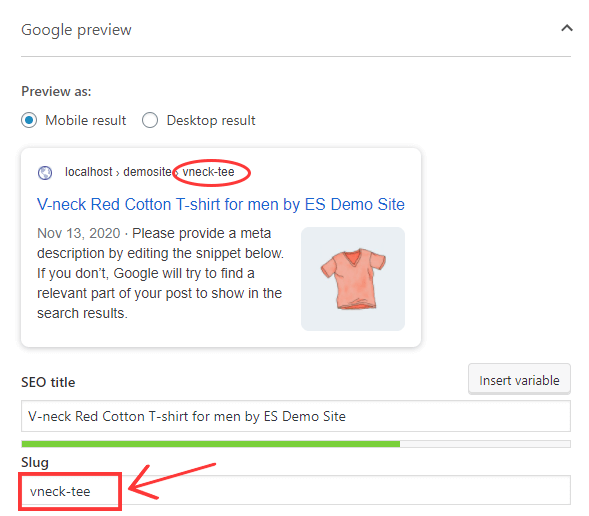
WordPress uses your product’s title as the slug for the page. However, sometimes the default slugs do not include any relevant SEO keywords. Like in the above image, the slug is entirely different from the keyword we want it to rank for.
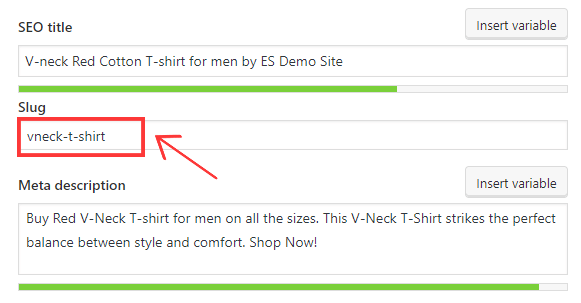
So, change the product slug in your product’s SEO settings and make sure that you use your target keyword in the slug and don’t make it too long.
Here’ ‘s the updated slug for our V-neck T-shirt –
9. Always add Alt text to images
Alt text plays a very crucial role in image SEO. Search engines like Google use image titles and alt text to know what the image is about and for which keyword it should be ranked.
They also use AI-based image recognition, but alt text helps them understand the context of the image used.
You can add alt text to all your product images while uploading them on WooCommerce or edit them later.
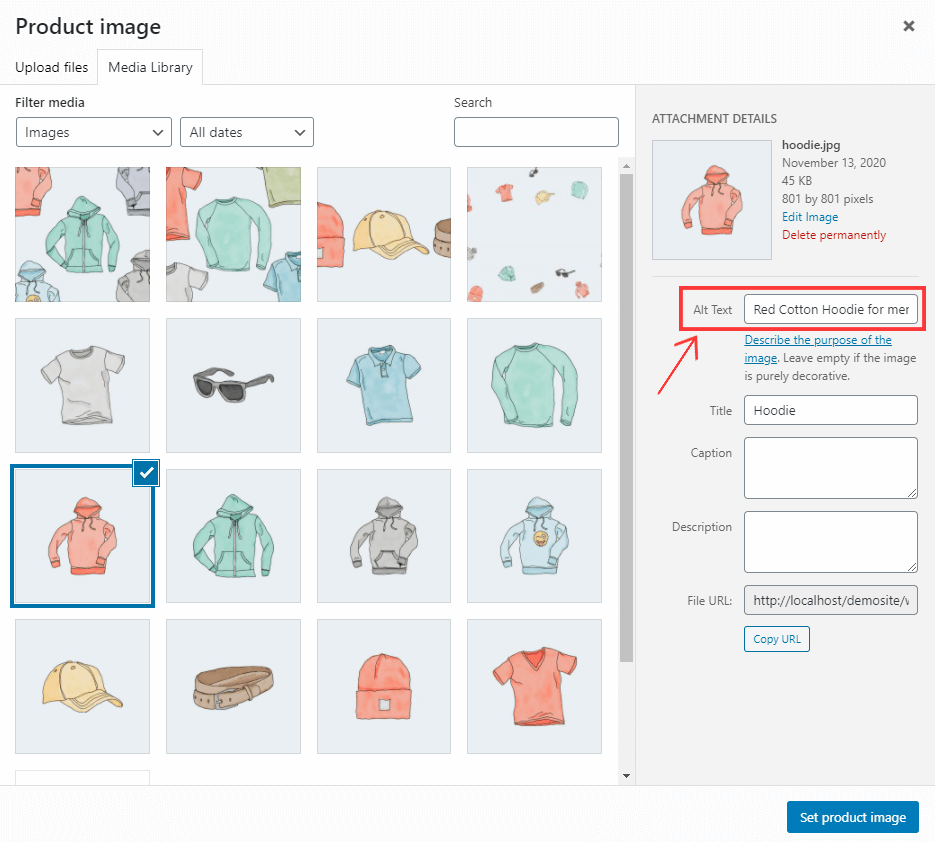
Alt text is a great place to add your target keywords so, while adding this text, always provide a good description for the image with your keywords.
10. Enable product reviews
Product reviews are a great source of unique and fresh user-generated content for your site. And it also boosts your SEO ranking.
To enable the product reviews on the WooCommerce site, you will need to go to WooCommerce » Settings » Products.
Scroll down, and you’ll see a review section where you can enable star ratings on the product pages.
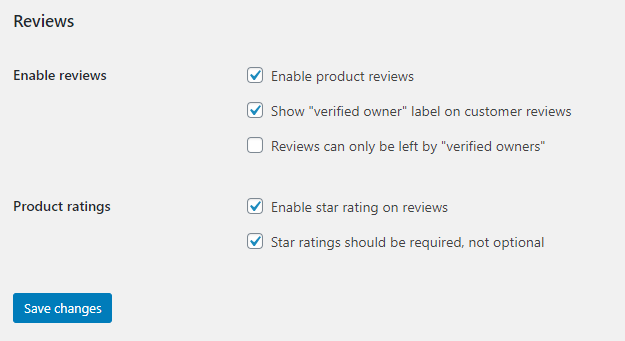
Google takes online reviews pretty seriously when it comes to search engine ranking for eCommerce sites. Every review acts as fresh new content for Google, which is one of their highest ranking factors.
WooCommerce also allows you to moderate and remove spam reviews to keep the review section relevant. Moreover, as the owner of an eCommerce site, reviews will help you understand how your products are being
11. Focus on internal link building
Internal Links are very crucial for eCommerce SEO. It helps Google navigate through pages and discover new content on your site.
Here’s what Google says about its website crawling process:
There isn’t a central registry of all web pages, so Google must constantly search for new pages and add them to its list of known pages. Some pages are known because Google has already crawled them before. Other pages are discovered when Google follows a link from a known page to a new page.
It means that when you are adding new products to your site, you must link back to that product page from old pages, including blogs and other product pages.
One of the best ways to improve the internal link structure on your eCommerce site is by adding the “Related Products” section.
To add related products on the WooCommerce site, you can add products in the Upsells section under the LinkedIn Products option while adding new products.
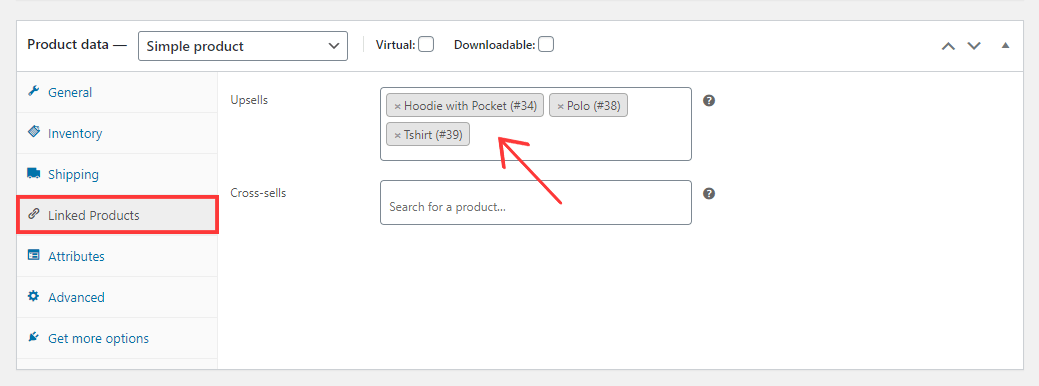
We also recommend linking back to the product pages from blog posts as well. To get internal link suggestions, you can use the Link Whisper plugin. It allows you to add the links easily with just a few clicks.
12. Enable breadcrumbs
Breadcrumbs are another great way to improve the internal link structure on your site. Breadcrumbs are basically navigational links that appear on top of product pages and blog posts as well.
It is an optional thing to show it on webpages or not. But we always recommend enabling the breadcrumbs on eCommerce sites both for user experience and search results.
For users, breadcrumbs help them navigate back and forth from one page to another. Here’s how it appears on product pages –

And for search results, breadcrumbs help them understand the structure of your site and the relation between the products and categories. Google displays the breadcrumbs in the result pages as well.

Now, to enable the breadcrumbs for your WooCommerce store, you need to go to the Yoast SEO » Search Appearance » Breadcrumbs and turn the toggle to enable the breadcrumbs.
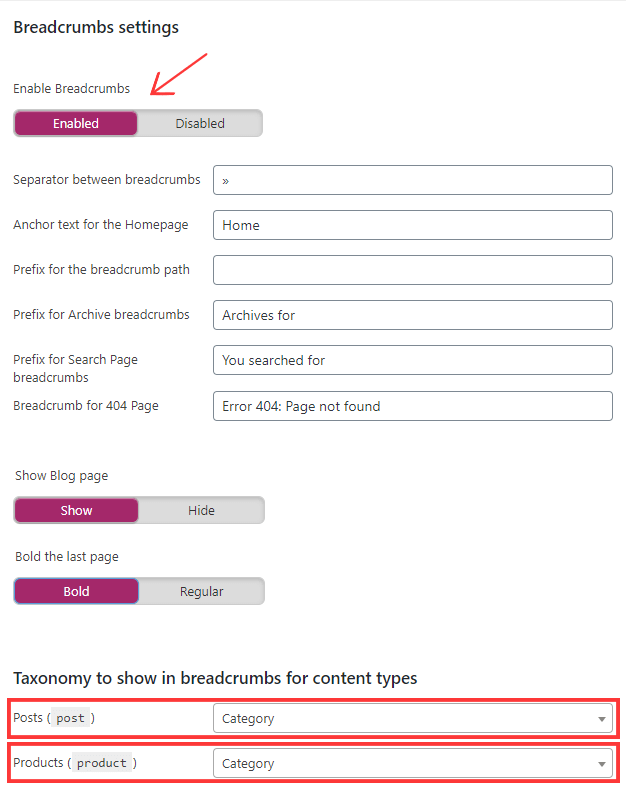
In the above, you can see our recommended settings for Breadcrumbs. You can also change the separator and other elements of the breadcrumbs from there.
13. Optimize Image sizes
On an eCommerce site, you have to put high-quality images of your products, and it can be of large size, which can result in low page loading speed.
To optimize the page loading speed, you will need to reduce your images’ size to an extent without affecting the quality of images.
There are several WordPress plugins that you can use to compress and resize the images. We recommend ShortPixel as a WordPress Image optimization plugin. It optimizes up to 100 images/month for free. If you need to optimize more images, you will need its premium version, which starts at only $4.99/month.
14. Optimize product category pages
For eCommerce sites, category pages are essential pages, and you want these pages to rank on search result pages.
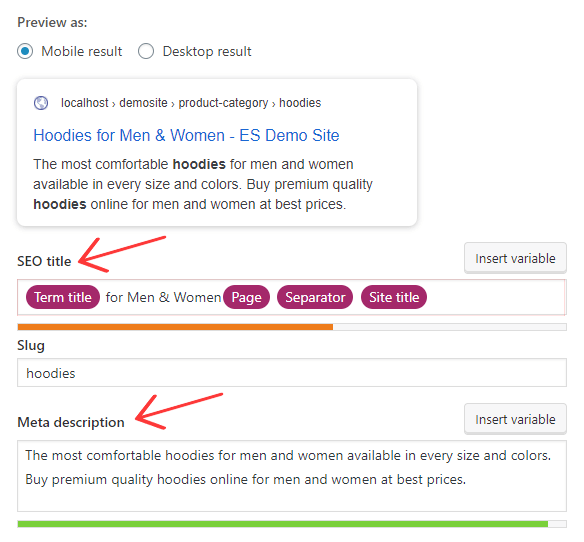
WooCommerce allows you to optimize the product category pages like other pages. Go to Products » Categories and select one of the categories to edit.
Now, add the Category description and make sure that you are using the targeted keywords for that category.
You can further edit the meta title and description of the category pages by scrolling down to the Yoast SEO section.
Other important WooCommerce SEO Tips
If you have been following these steps, then till now, you have completely optimized your WooCommerce store.
But there are a few more things that you must consider while building your eCommerce store on WordPress.
1. Use SEO-optimized themes
WordPress is the most SEO-friendly platform to build an eCommerce site. But themes also play a very crucial role in the on-page SEO of the site.
Here are a few key factors that you must analyze before buying a theme –
- Fast loading speed
- Responsive design for mobile and desktop devices.
- Compatible with your preferred SEO plugin
- Makes use of Schema.org markups
If you don’t want to go through WordPress theme marketplaces and find a theme for your stores, you can check out our complete list of the best WooCommerce themes.
2. Install a WordPress cache plugin
One of the most important Google ranking factors is loading speed. The faster the page loads, the higher it tends to rank on result pages.
And that’s why you need a cache plugin for your WordPress site. In simple words, Cache plugins preload your website assets on the Server and minify the files so that they load faster on the end-user’s browser.
At EcomSutra, we recommend using WP Rocket, the #1 WordPress cache plugin to optimize your site for better speed performance.
3. Improve WordPress security
Google takes the security of a website very seriously to ensure users’ safety from scams, malware, and phishing websites.
Also, WordPress is the most popular website-building platform, which also makes it vulnerable to hackers. So, you must secure your website from brute force attacks, malware injection, and data theft attempts.
To improve your WooCommerce security, you will need one of the best WordPress security plugins. There are several WordPress security plugins that you can use but two of our favorite and trusted ones are Sucuri and iThemes Security Pro.
WooCommerce SEO checklist
SEO plays a very crucial role in the success of an eCommerce site. By Completing this WooCommerce SEO checklist, you can make sure that your online store is SEO optimized and can rank higher on result pages with a proper eCommerce SEO strategy.
Here’s the checklist to optimize your WooCommerce store for SEO –
- Make sure your site is Indexable
- Update permalinks for posts and product pages
- Install & set up the WordPress SEO plugin
- Submit sitemap to search engines
- Connect Google Analytics
- Craft SEO-friendly Product titles
- Always add SEO-optimized product description
- Keep the product slug short and SEO-friendly
- Always add Alt text to images
- Enable product reviews
- Focus on internal link-building
- Enable breadcrumbs
- Optimize Image sizes
- Optimize product category pages
We hope that this guide helped you make your WordPress eCommerce site Search engine friendly. If you are looking for WordPress plugins for your site, you should also check out our complete list of best WordPress plugins for an eCommerce site.
